
Abstract Nature: Personal Project 1
Abstract Nature: What is Abstraction?
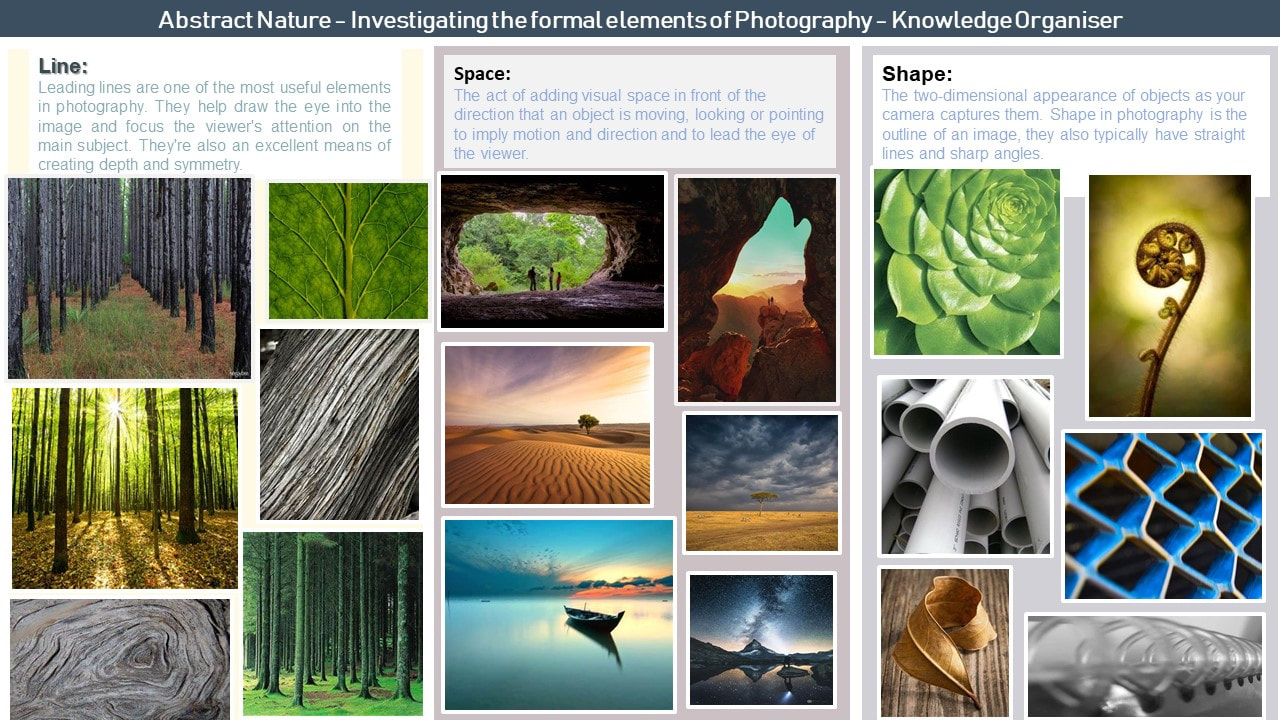
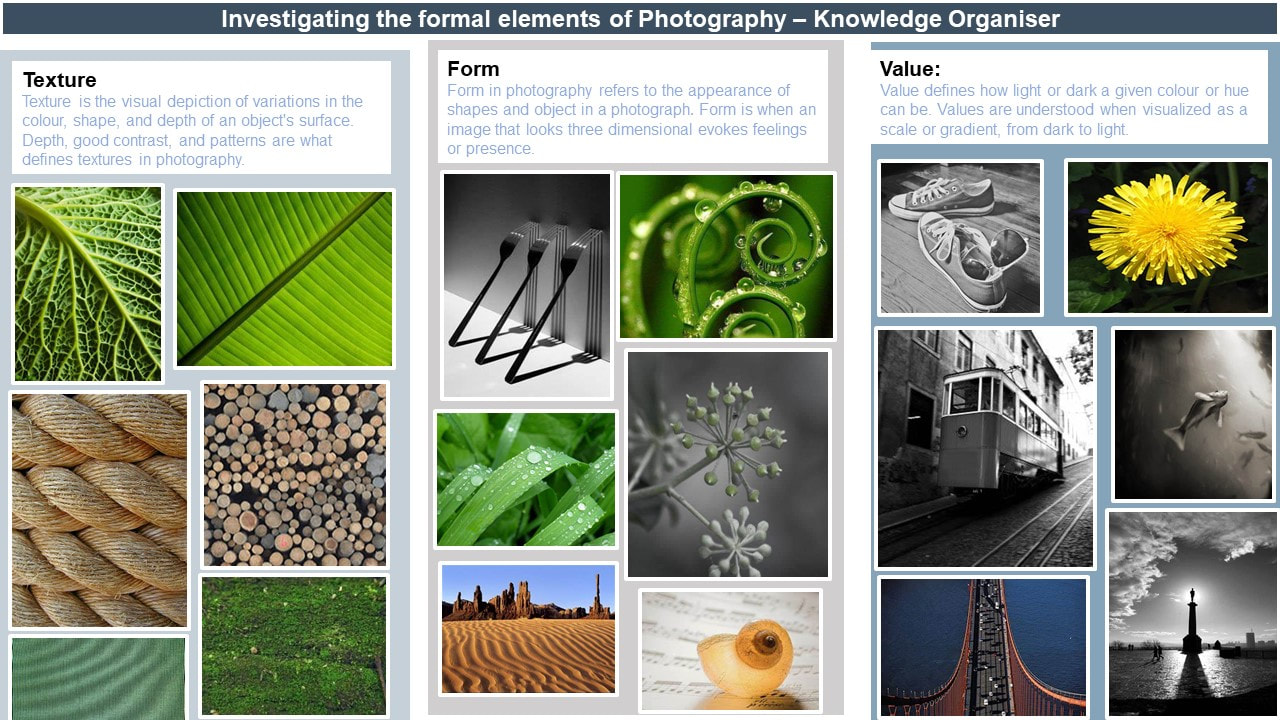
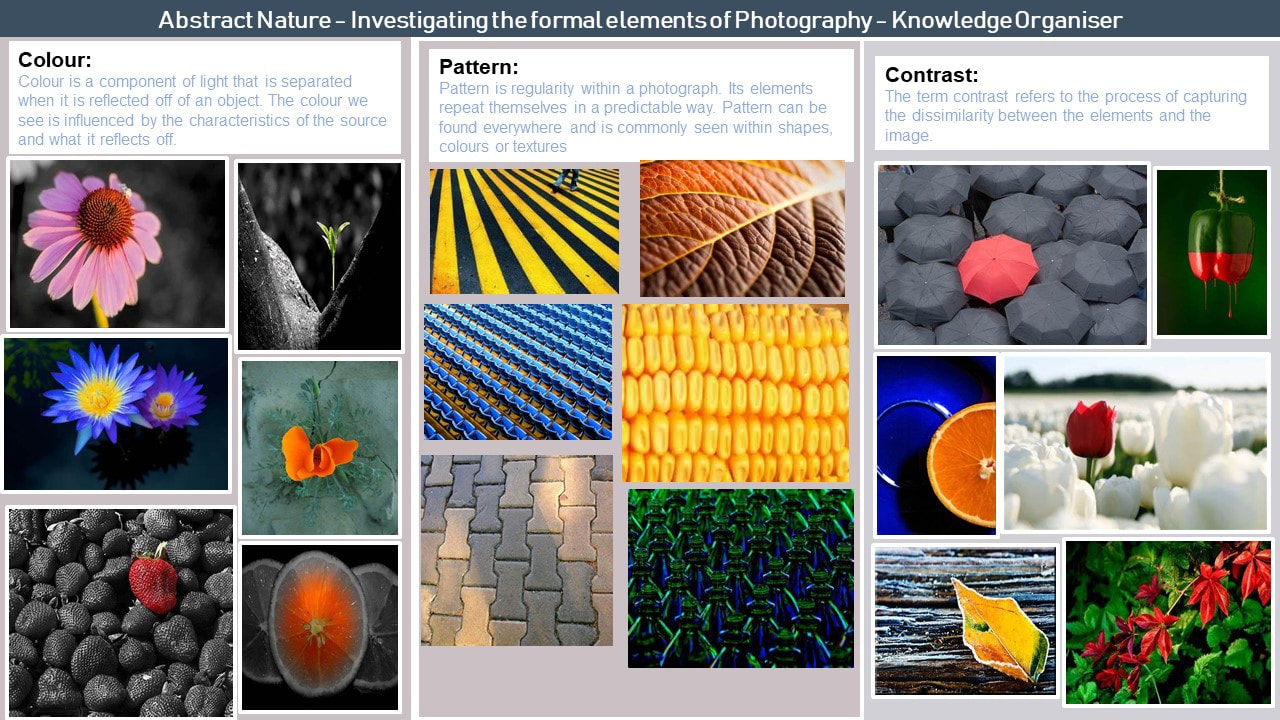
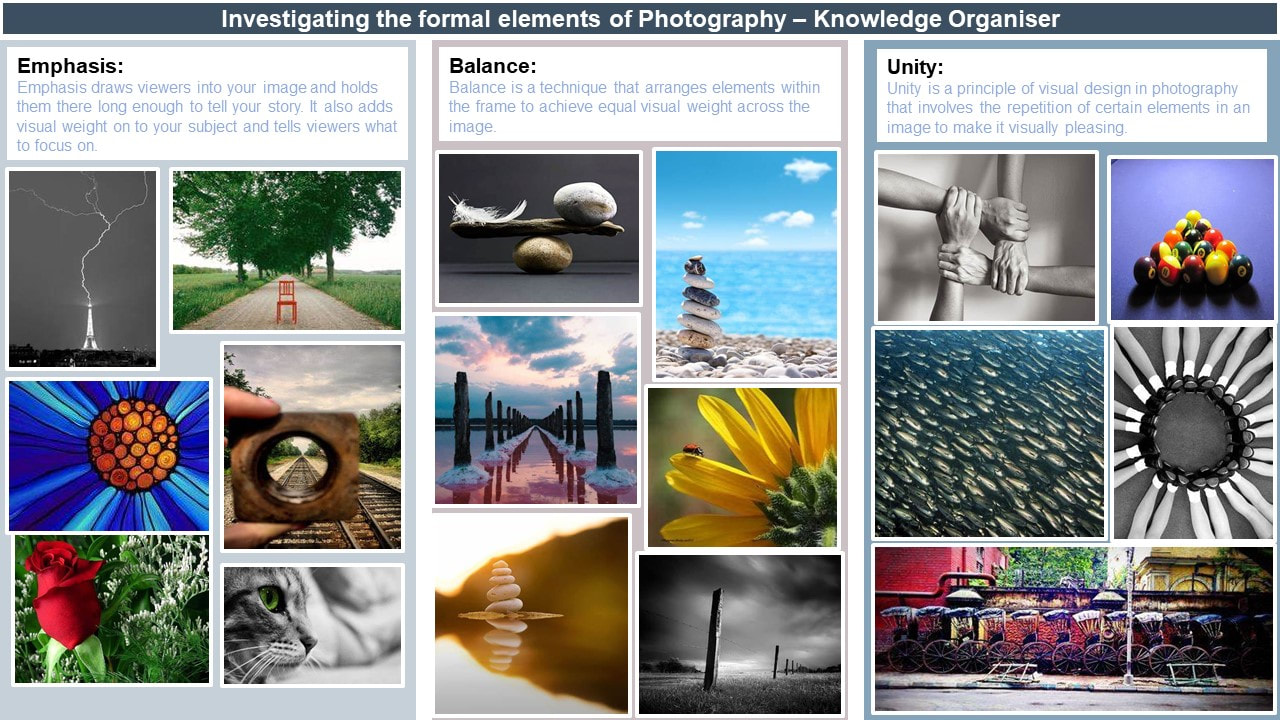
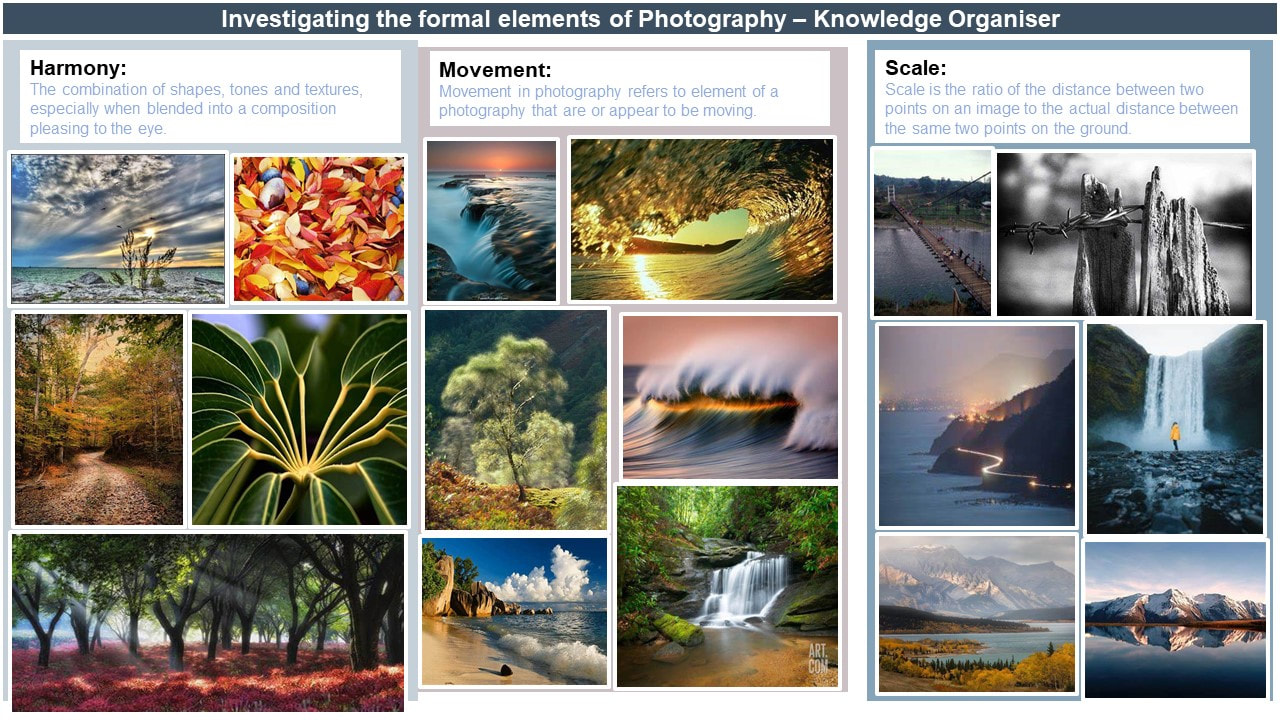
Abstract photography can sometimes be called non-objective photography, experimental or conceptual photography. This means depicting a visual image that does not have an immediate association with an object and that has been created through the use of photographic equipment, processes or materials. Primarily, abstract photography focuses on the elements or art (line, shape, colour, tone, texture, form and space) and the principles design (balance, harmony...). These are known as the formal elements of photography. Below are some examples of abstract photography that I am inspired by and some initial research into the formal elements of photography.


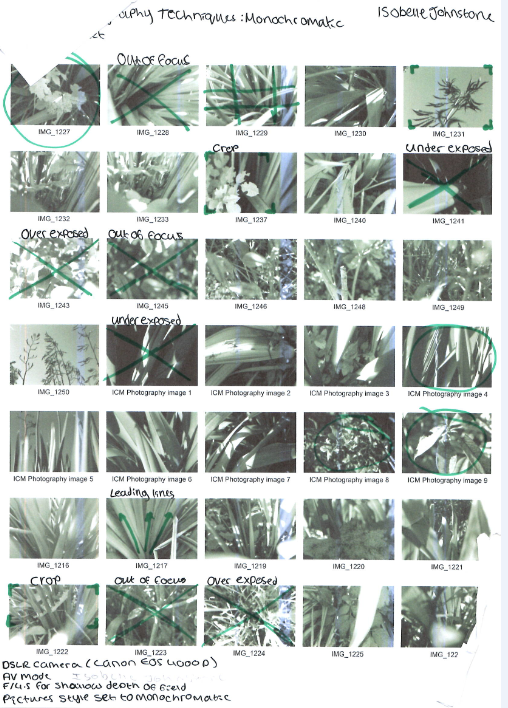
Abstract Nature: INVESTIGATION OF ABSTRACT PHOTOGRAPHY TECHNIQUES // Monochromatic Photography contact sheet:


|
Doing a shoot whilst having a monochromatic can have both advantages and disadvantages. But I think there is mostly advantages one of them being that because there is no colour in the images it draws the viewers eye to the actual image instead of the colours and the textures and shapes within the images are more defined then when there is lots of colour. This is useful because it makes the viewer think about what has been photographed because sometimes objects can look as if they are something completely different just because the effect of colour has been taken away from them.
For my shoot I used my camera (Canon EOS 4000D), I used the monochromatic option on my camera (black and white) and a standard kit lens. Whilst doing this shoot, I used F stop 4.5. This allowed me to see in a higher detail and have sharper images. Most of the images I took were taken very close to the subject but some of them were taken facing upwards towards the sky which I used as a background. The environmental conditions were that it was sunny outside when I did my shoot which created a natural light in my photographs. It did not affect my shoot that much but in some places it did because it would be too sunny but all I had to do to fix that was to change the shutter speed to a different number to allow less light in. I used different vantage points within my shoot like eye level and ariel because it allowed me to see different plants in other areas. Though this shoot was taken outside I could use that to my advantage and use the natural light provided to have some contrast in a few of my images which created a nice effect. I found most of my images successful because of the leading lines and contrasting tones within a few of my images. |
|
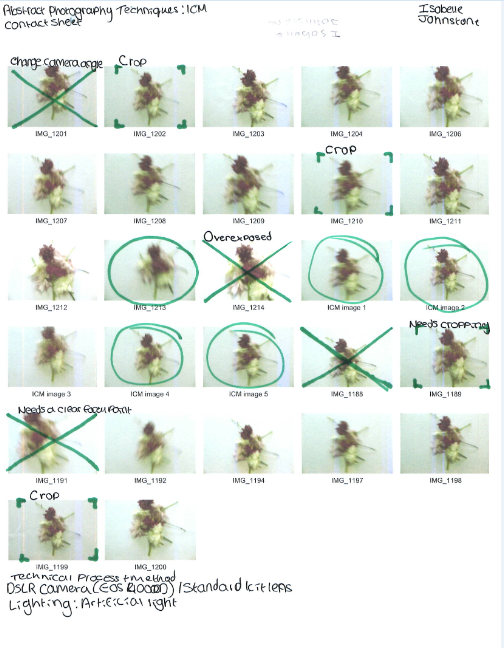
ICM (Intentional Camera Movement) contact sheet:


|
ICM (Intentional Camera Movement) involves a camera moving whilst the photograph is being taken. This causes different parts of the image to move resulting in streaked lines and a change in shapes and colours. The movement presented in the image creates an unidentifiable object. This can be use in abstract photography by making the object which is being photographed completely unrecognisable.
During this shoot I used my canon EOS 4000D and a standard kit lens. To get the images above, I had to move the camera as I was taking a photography in either a sideways motion, a nodding motion or just a 180-degree rotation to achieve a blurry or spiralled effect. I tried to get the main focal point of the image (the middle) to stay in focus as I moved my camera, but I was not able to achieve this. Because I was indoors during this shoot, I had an artificial light source which came from the lighting inside the room I was in. It was difficult to be able to do the different movements with the camera as I was taking the photographs, so I only got a few successful images, but the shoot was mostly successful in my opinion. |


|
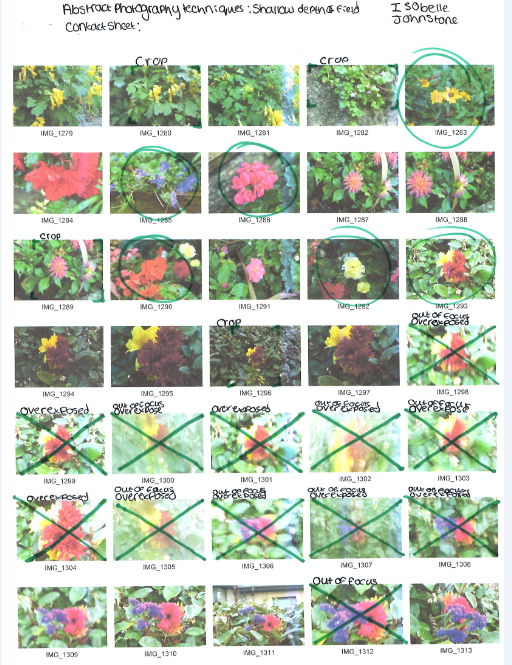
Shallow Depth Of Field Photography Contact Sheet:


|
A shallow depth of field can be used in abstract photography to blur the subject's surroundings. This means that the photographer can create a main focal point for the viewer without the surroundings taking over the subject. Having a blurred background also allows for the image to sharper and will make the viewers to take in more detail from the main focal point.
For this shoot I used a DSLR camera (Canon EOS 4000D) and a standard kit lens on AV priority settings the images I took have an aperture of f/4.5. During this shoot I didn't face many challenges, but it was cloudy outside as it had just been raining though tis didn't really create a huge problem for me. Although it had just been raining it did allow me to capture some interesting close-up photos of some raindrops on different flowers and plants. This added to the textures in my photos creating a nice effect. Though this shoot was taken outdoors i could use this to my advantage by using the natural light for my images. I did this by having my focal points the same way the sun was bouncing off of my subjects which created a nice effect. The heightened detail in some of my images gave them a higher quality finish. |


|
BEST IMAGES

|
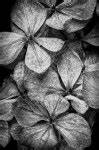
I believe this photo is successful because it has different techniques embedded within it. There are different principles of photography used within my final image including contrast. This has been used within the leaves where some of them were lighter and some darker. In this photograph there is also a shallow depth of field visible. You can also see that because of the contrast that there is also visible texture where the leaves are. I chose this image for the reasons suggested above. To edit this image, I used the adjustment setting on pixlr and then continued to use the levels, curves and the temperature options in which I used to create a nice silver/blue effect on my image.

|

|
I believe this photo is successful because I used different elements of art including line. You can see this from the way that the leaves are pointing as it is creating multiple lines within the image. The entirety of the photograph is in focus which allows for the image to look sharp. Though the main focal point of the image is not one hundred percent clear I would say that it is the closest leaf that is in the foreground of the image. To edit this image, I used the adjustment setting on pixlr and then continued to use the levels, curves and the temperature options in which I used to create a nice silver/blue effect on my image.

|

|
I believe this photo is successful because different skills were used to create the final image. One if the skills I used within my image is contrast. This is seen where the light from the sun has hit the leaf which was in a more shadowed area outside. You can also see that there is line and pattern on the leaves. I chose this image for the reasons suggested above. To edit this image, I used the adjustment setting on pixlr and then continued to use the levels, curves and the temperature options in which I used to create a nice silver/blue effect on my image.

|

|
I believe this photo is successful because there is also contrast in my image where the leaves above my main focal point have created a shadow onto my subject which created a noticeable difference between light and dark. Because of the reasoning above, I believe that this photograph was successful. To edit this image, I used the adjustment setting on pixlr and then continued to use the levels, curves and the temperature options in which I used to create a nice silver/blue effect on my image.

|
Artist Investigation // Edward Weston
"To compose a subject well means no more than to see and present it in the strongest manner possible."- Edward Weston

|
To begin my abstract nature artist investigations I will initially study the work of Edward Weston because he was alive during the period of view cameras which produced extremely detailed images.
Edward Henry Weston was born on the 24th of march 1886.He was a 20th-century American photographer. Over the course of his 40-year career Weston photographed a large set of subjects, including landscapes, still-life and portraits. I chose this quote because it says that a good photograph means that it is presented in a good way and it doesn't particularly matter what the subject is. This video is inspirational to me because it explains why Edward Weston took photographs and what they meant to him. It also says that you have to look closely into his photographs to get the real meaning of them which i think is a good thing for everybody to remember. Below are a selection of 10 Weston images that are inspirational to me because I think the photographs send the message that things aren't always what they seem. |


SEMI Analysis // Edward Weston


|
Subject:
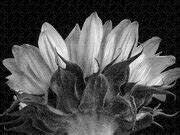
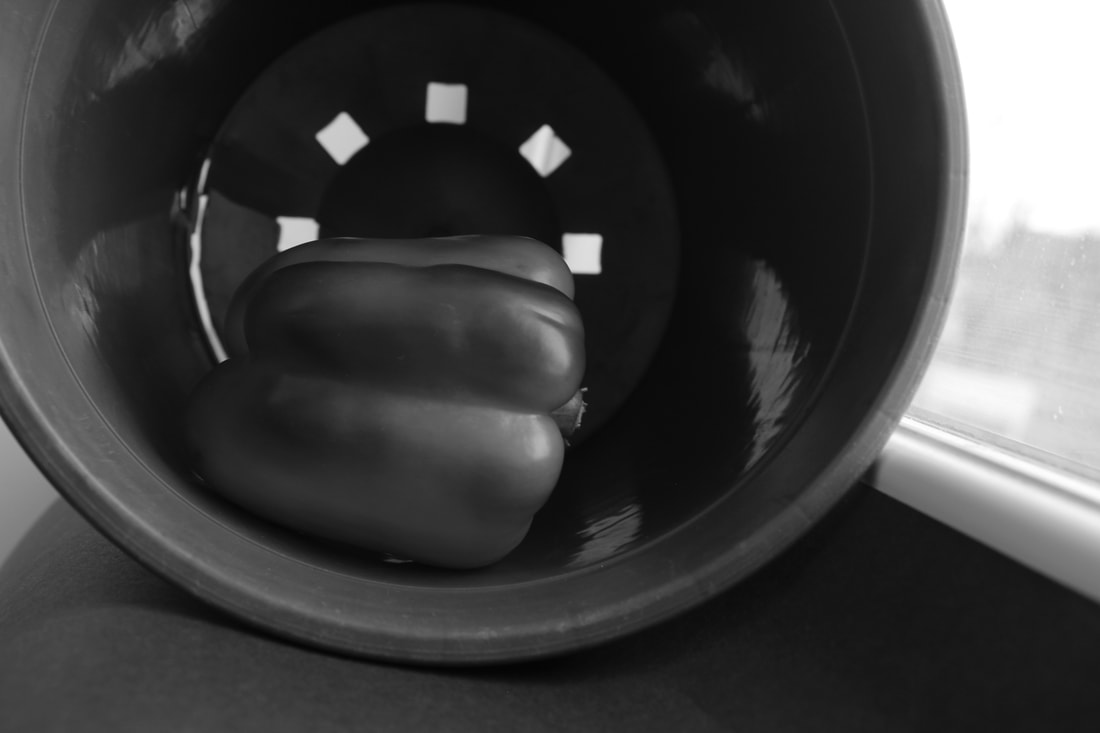
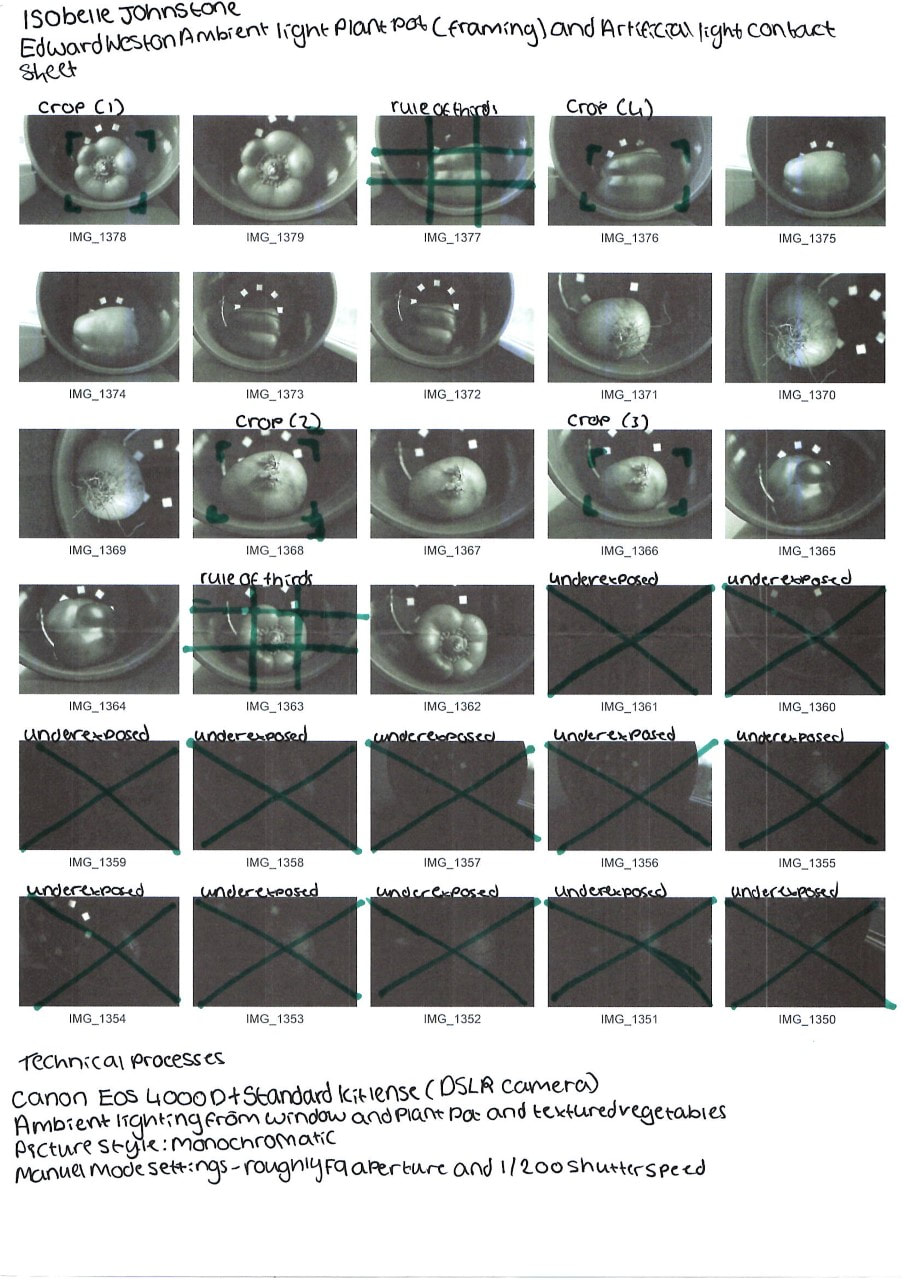
The photographer of this image is called Edward Weston and the images title is pepper no.30 and it was created back in 1930. The genre of this photograph is still life but it is also an abstract image. The prop I can see in this image is one green pepper which is slightly deformed. Elements: The composition of photo shows a single green pepper in the foreground of the image. The viewers eye is lead to the top right of the image. The perspective Edward Weston has used is an eye level shot and this perspective is effective because it allows the viewer to see the entire photograph. The photographer employs a range of visual elements in his work including colour and texture. Media: This photograph has been taken from a short distance this is the that the green pepper is the main focal point of the image. The pepper has been placed in the foreground of the image by doing this the viewers eyes are led straight to the pepper. The light source was placed on the right hand side of the pepper which is highlighting the higher regions of the pepper. To emulate this photograph myself I would take the photo in an extremely dark room with a lamp or similar next to me. I would also need a pepper and a plant pot. Intent: I feel like this photograph feels mysterious and also quite sombre. It creates this by making the image quite dark and shadowy with different tones of black and grey within it. This is relevant to my project as I am doing Edward Weston and the image was taken by him and was one of his most famous images. My opinion on its strengths is that the pepper looks very obscure and that it makes it look abstract. |


Technical processes // Low Key Photography

|
Low key photography can be extremely challenging for a lot of photographers. Low-key photography is a genre of photography consisting of shooting in a monochromatic style and emphasizing natural or artificial light but only on specific areas in the photograph. Low key photographs also have an emphasised contrast between lighter and darker tones. Low key photography can also dramatize feeling and emotions through a photograph.
|
Shoot Plan // Edward Weston
|
Edward Weston has inspired me to do this particular because I find that his work is different to other photographers work from the time and because of that his work stands out to me. I will be doing this shoot at roughly midday inside of a room with quite a lot of natural lighting that I can take advantage of. To do this shoot I will need one plant pot and a range of different fruits and vegetables. I will be using the plant pot as a background for my image and the various fruits and vegetables will be used as my main focal point in the photograph. The lighting conditions I need for this shoot is for it to be, bright and sunny outside and to have the natural lighting to hit the side or front of my fruit and vegetables. I need all of this so I can have a successful low key photography shoot. I intend to shoot with a DSLR camera (Canon EOS 4000D) whilst using a window ledge to stabilise my camera for an ideal shot and to prevent camera shake. I also intend to use a relatively larger aperture f/6.2 for my shoot and a faster shutter speed 1/20 for my photographs. This is so that my main focal point (the fruit or vegetable) is the only clear thing in the image and so that not as much light gets into my final image.
|
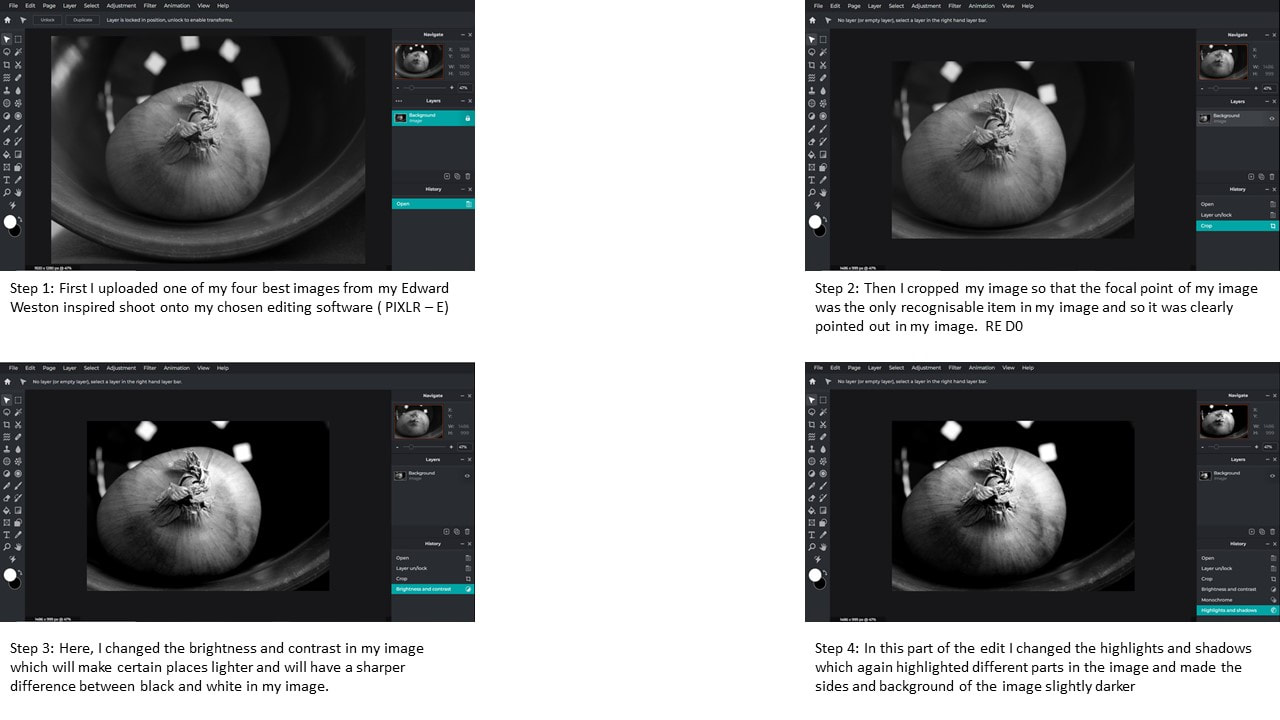
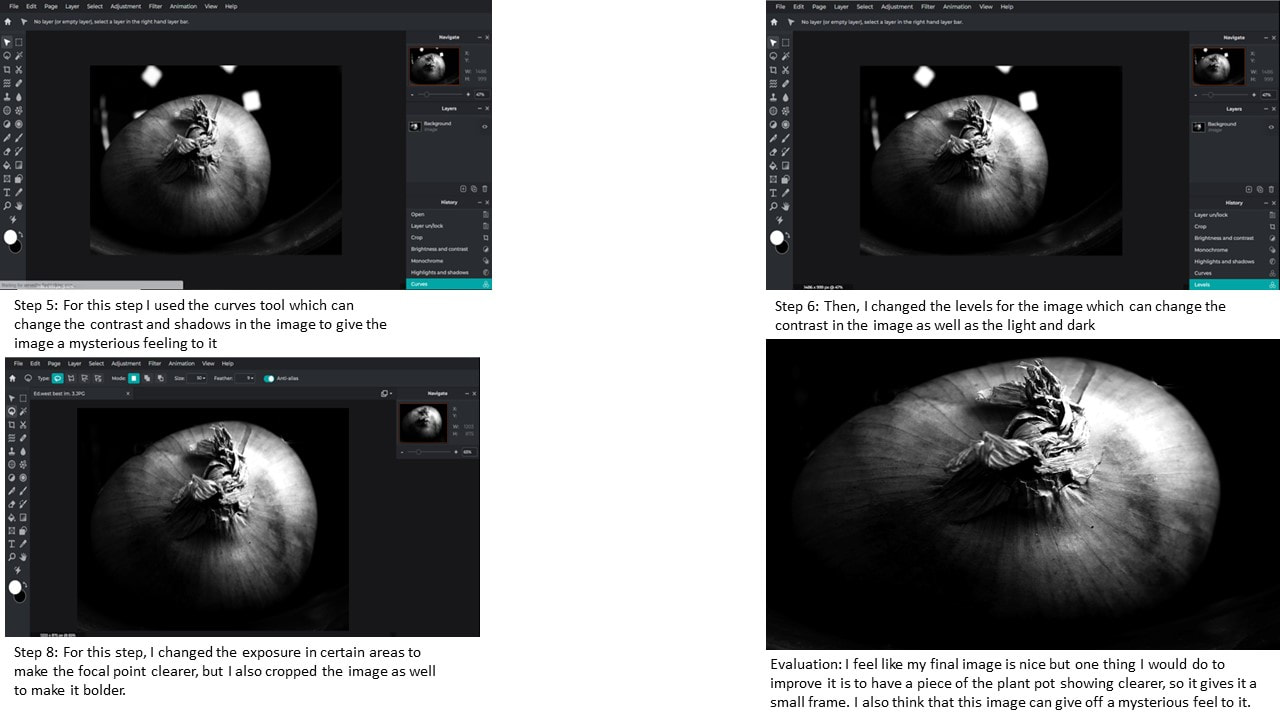
Editing Process Low Key Photography // Edward Weston
Best Edits // Edward Weston

|
I chose this image because I really like how the top of the onion is twisted. I think the strengths of this image are the shadows and the contrast between light and dark. When editing this image I cropped it, changed the brightness and contrast and added some highlights to it. When taking this image I used the ambient lighting that was available to use because it was a relatively cloudy day.
|

|
I chose this image because I really like how the small details on the side of the pepper are more noticeable. When editing this image I cropped it, changed the brightness and contrast and added some highlights to it. When taking this image I used the ambient lighting that was available to use because I was next to a windowsill and because it was quite a cloudy day.
|

|
I chose this image because of the details that you can see on the skin of the onion. I think the strengths of this image is that so much detail in the onion is visible. When I was editing this image I changed the levels of the image to change the difference between light and dark in the image. To take this image I used the ambient lighting from outside even though it was a relatively cloudy day outside.
|

|
I chose this image because of the details shown in the pepper. I think the strengths of this image is how the way that the pepper is situated gives it more contrast in the areas of high detail. When I was editing this image I changed the curves which will make the difference between black and white shaper. Again, I used the ambient lighting to take this image.
|
Abstraction Through Cyanotypes // Anna Atkins

|
Who was Anna Atkins?
Anna Atkins was born on March 16th 1799 in Kent, England and died on June 9th 1871. Anna was an English botanist and photographer who was known for her early use of photography for scientific purposes. Atkins could be one of the first female photographers for this time. Anna created cyanotypes with lots of different natural forms. What Are Cyanotypes?
A cyanotype is a 170 year old photographic technique that produces images in a green / blue colour. This process was invented by Sir John Herschel who was an astronomer and scientist. Disadvantages Of Cyanotypes
A few disadvantages of cyanotypes are that the sensitizer is often not well absorbed by the paper and can sometimes tend to lie on the surface. This can make it look tacky and can affect the final outcome. Advantages of cyanotypes Some advantages of doing cyanotypes is that the process is relatively easy and quite cheap. As well, you can use a range of material and you don't need to but any complicated equipment. |


|
Annotations:
To make the cyanotypes in lessons we prepared some water colour paper by washing it with an iron salt solution to create a larger difference between the imprints and back round. To create the fabric one, I did the same process as the watercolour paper one but I used fabric instead of paper. To create my acetate example I used an image from my Edward Weston shoot and inverted it using PIXLR-E and printed it onto acetate. I think my fabric cyanotype was my most successful one because of the detail that it shows and how that it goes from bold to hardly viewable. If I had another lesson on this topic, I would like to re do my acetate onion because I don't particularly like it and feel like I could create a much nicer one. |
Abstraction Through Photograms // Man Ray
Advantages Of Photograms
When you are creating your photogram, you have much more control over what is happening to the layout and design of your image. This is also a great way to have an abstract image and to have a large contrast between colours and often makes the final product look quite strange. |
Who Was Man Ray?
Man Ray was born on August 27th 1890 and died on November 18th 1976 and he was an American visual artist who spent most of his career in Paris He was best known for his pioneering photography. He was also a famous fashion and portrait photographer. What Are Photograms?
Photograms are photographic images made on paper without using a camera and it is made by placing some objects between light sensitive paper and a light source. Disadvantages Of Photograms
Though there are a lot of advantages to photograms , there are also disadvantages to them like how it is much harder to get the level of detail you want. And that many genres of photography cannot be done using this style. As well, the process involves many chemicals and a dark room that people might not have access to. |


Horst P. Horst // Unfamiliar and Abstracted

|
Fashion photographer Horst P. Horst used rotational symmetry to create new patterns. His book, Patterns from Nature (1946), has inspired me to create my own series of rotational symmetry patterns using my work so far. Here are some of my examples:
|


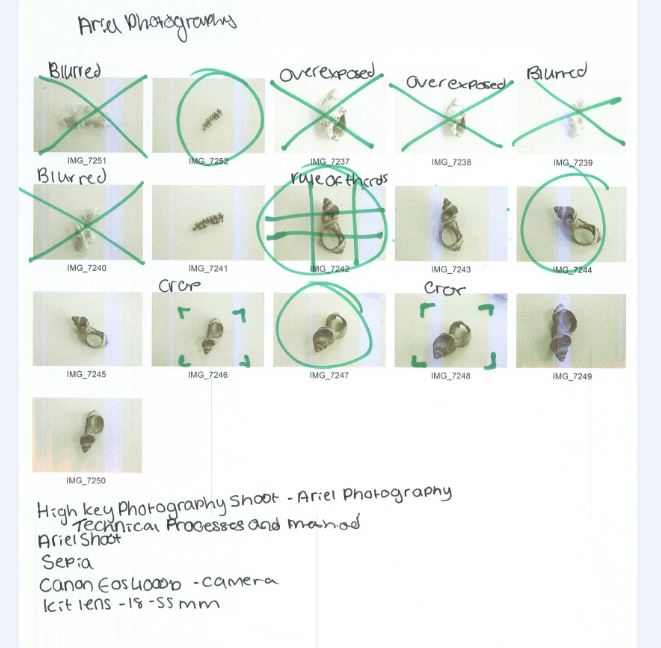
Technical Processes // High Key

|
What Is High Key Photography
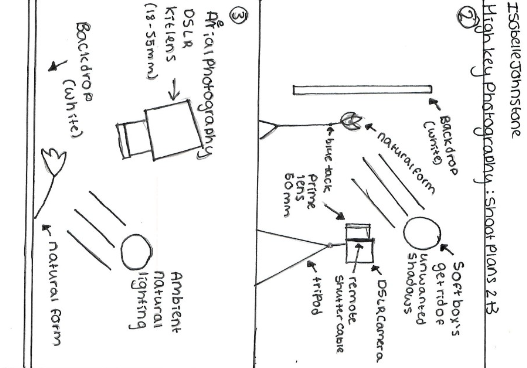
High key photography is when an image consists of mostly lighter tones with little to no shadows in it. A benefit of high key photography is that it gives your image a unique or unusual look. These images can also give viewers an unexplained joyful feeling. The recommended camera settings for high key photography is a remote flash with a power of 1/8, 1/50 shutter speed with an F/16 aperture and an ISO of 100 Shoot Plan // Karl BlossfeldtThis particular shoot was inspired by the work of Karl Blossfeldt because I have been studying the way he created abstract forms from nature and I want to emulate his work/images.
This shoot will take place in a classroom because that's where I can control the lighting best and because I can set up three different shoots here to experiment with high key photography. I will shoot in high key for my images 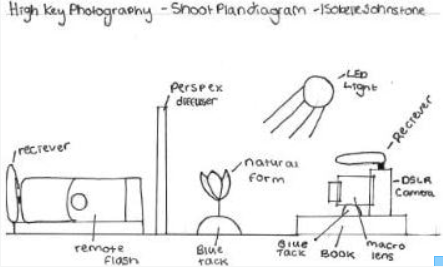
|


Artist Research // Karl Blossfeldt
Why this video?
This video looks at the influences of Karl Blossfeldt and the context behind his growth as an artist. In this video we also get a look on some of the work Karl has created and how he created it. Karl Blossfeldt's videos may also be an inspiration. |
Why Karl Blossfeldt ?
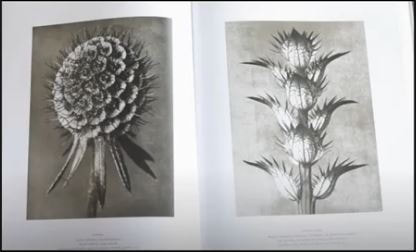
Karl's work links to our topic of abstract nature. He has had a large influence on modern photographers, and is considered by some 'a master of still life'. Karl Blossfeldt also uses a macro lens to take his photographs which we are using in this topic. Who is Karl Blossfeldt ? Karl Blossfeldt is a German photographer and is best known for his precise photographs of plants however, he began his career as a sculptor, completing apprenticeships at the ironworks and foundry in Mägdesprung and the Kunstgewerbeschule (Institute of the royal arts museum) in Berlin from 1884 to 1890. "My botanical documents should contribute to restoring the link with nature. They should reawaken a sense of nature, point to its teeming richness of form, and prompt the viewer to observe for himself the surrounding plant world." Why this quote? I chose this quote because it shows how enthusiastic Karl is by his work and by nature. Karl is also suggesting that nature links in with everyday work / every day life. |
SEMI Analysis // Karl Blossfeldt
Subject:
The photographer who took this image was called Karl Blossfeldt who was best known for his photography of plant and living things he was also known for his sculptures. The title/ name of the photograph I have chosen is 'Saxifraga wilkommiana'. The genre of this photograph is still life and the only item/ prop I can see in this image is the plant that is in it.
Element:
Karl used the elements texture, line and space to create this image. In my opinion the most noticeable element out of the three I selected is texture because of the details of the plant in the image. I also think that line is used well because of how there are different lines/ curves on the plant that he used that catches the viewers eye. I also think that space was used well because the fact that the plant was the only item shown and the fact that it has a lot of space in and around it makes it look more visually pleasing.
Media:
The main focal point of this image is the plant that is in the middle of the picture. I can tell this because it is the only item/ prop in the image and because it is placed in the middle of the image. This photo was taken using the camera that he made himself inside of his house. I also believe that the lighting is coming from the left hand side of the plant I know this because There is highlights coming from that side of the plant and because there is shadows on the right side of the plant. To emulate this image myself I would need to use the monochrome setting on my camera, find an interesting plant/ prop to to photograph and shoot on a day that has a good amount of natural lighting so that I have good lighting.
Intent:
I feel like this photo gives a mysterious message and it gives a sombre feeling. I think this way because it is secluded and dark which makes me feel like this. When I take my own photographs I will try to re create this atmosphere by having a singular plant on its own with a white background


Karl Blossfeldt // High Key Photography //Contact Sheets
|

|

Karl Blossfeldt // Editing Process
To edit my best images from my Karl Blossfeldt shoot I used the online software called PIXLR-E. When editing my images Focused on three key areas of cropping, adjusting the background and changing the levels on the image. Here are some screenshot that I have taken of the process of editing my images.
Step one: First I cropped my image and then proceeded to apply the rule of thirds onto my image.

Step two: Then I used the wand select tool to select the background of my image and then made the background lighter by going on adjustment and selecting levels.

Step three: Finally, I unselected the wand select tool so I could change the levels on the whole image so that I could make my natural form slightly darker which allowed more detail to be seen.

Nine Best Images // Karl Blossfeldt


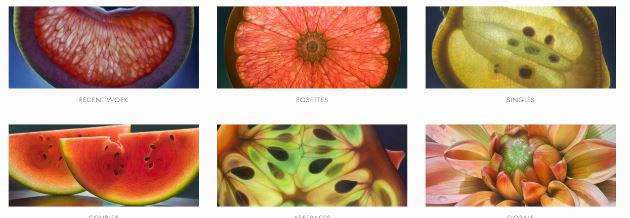
Art Investigation // Dennis Wojtkiewicz
"I use a Canon EOS 90D camera with a Canon EF 100mm f/2.8 Macro USM fixed lens. The only reason I even know about the technology is because my colleague told me that's what I needed and would be the biggest bang for the buck. The rest of it is all by feel. I have absolutely no photo training. For me that suffices because I'm not hung up on technical stuff. Just looking for ways to capture information for my paintings."
Dennis Wojkiewicz / Jan 2021
Dennis Wojkiewicz / Jan 2021


|
Why this artist? The final artist in the Abstract Nature project is Dennis Wojtkiewicz. This artist differs from my other artists because of his use of contrast between the colours that are in his work and because of the use of texture that creates an amazing level of detail. However, there are similarities in his use of tone and line for example in some of his images the outside edge of his images are darker than the middle is. As well, his use of line is also used well because of the different shapes that he has created. Who is he? Dennis Wojtkiewicz was born in Chicago, Illinois in 1956 and is currently fifty-six years old. He is most famously known for being a hyperrealist artist and for his large scale renderings of sliced fruit and flowers. His website is: www.wojtkiewiczart.com Why the quote? The quote is from a direct email response from Dennis Wojtkiewicz himself. From the email, I was able understand what equipment & techniques he uses such as a Canon EOS 90D camera and a Canon EF 100mm f/2.8 Macro USM fixed lens. Why this video? This video is inspirational to me because it shows a range of his artwork whilst making them look extremely appealing. It also shows people that you don't need to have the best equipment to be able to produce a great end result. |


Photographic Techniques // Dennis Wojtkiewicz

|
What is backlighting?
Backlighting in photography is a way for photographers to create dramatic lighting, either in a studio setting (for things like portrait photography) or when shooting outdoors. What do you need to create back lit fruit? To create back lit fruit images you will need some glass some you can place your fruit on it and so you can place your source of light underneath it. You will also need a tripod so you get as little movement as possible, as well you may need a macro lens so you can get as close to your subject as possible but this is not needed. You can also use a shutter release cable so again there is little to no movement in your image. |

|
Step One: First you need to slice your chosen fruit so it is not to thin but also not to thick (the thinner the slice the more light will be let through.)
|
Step Two: Place you chosen fruit on the glass so that it is above you chosen source of light
|
Step Three: For your image set your aperture to between F/8 to F/12 for a good depth of field. You will also need to have a low ISO to get top quality images.
|
Step Four: Because there is till chance of movement when pressing the shutter it is a good idea to use a shutter release cable.
|
Explosion Sketchbook
|
|
|
Shoot Plan // Dennis Wojtkiewicz
|
This shoot has been inspired by the work of Dennis Wojtkiewicz because I have been studying his work and the way he makes regular fruits look abstracted. I will be doing this shoot indoors using a lamp underneath a piece of glass and ambient lighting from the room as my lighting. To prepare my shoot the props I will be using is a selection of citrus fruits and a kiwi (as seen below). The equipment I will be using is one piece of glass to place my fruit on and two chairs so my glass can be held up at equal heights. I will also be using a DSLR camera, a tripod to steady my camera and a trigger and receiver kit. The settings that i used on my camera is an aperture between f/8 and f/12, a slow shutter speed and a low ISO for better quality images.
|

|
Contact sheet //Dennis Wojtkiewicz

|

|

|
Post Editing // Dennis Wojtkiewicz

Editing Step 1: In this clip I used the crop tool and other adjustment settings like brightness and contrast, temperature and tint, hue and saturations and levels for my image. This allowed me to have certain contrasts and exposure in my final image.
|

Editing Step 2: In this step, I, used the lasso tool to delete the background of my image so I could make it white which would show the contrast between the main focal point and background in my image,
|
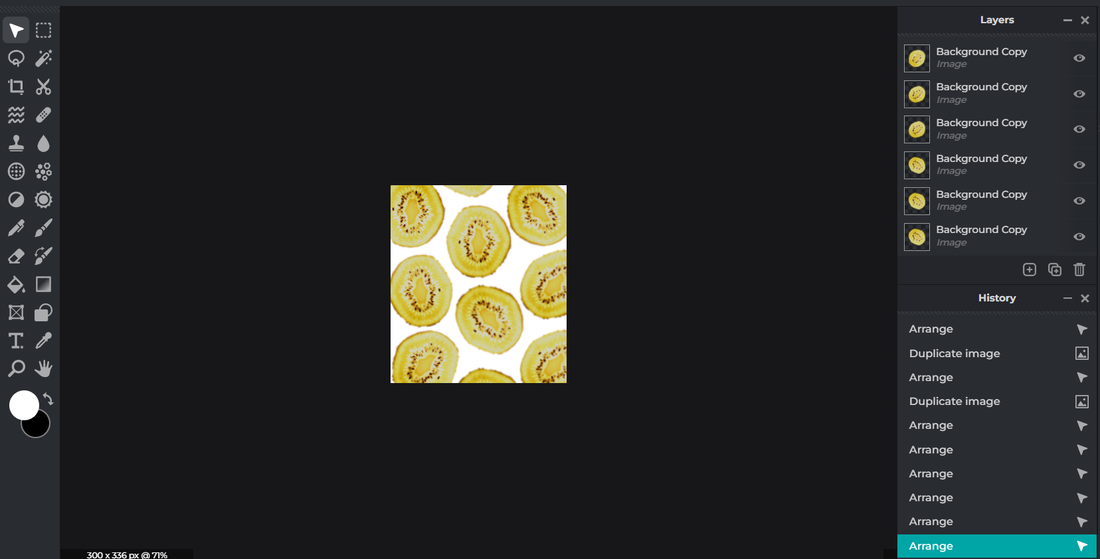
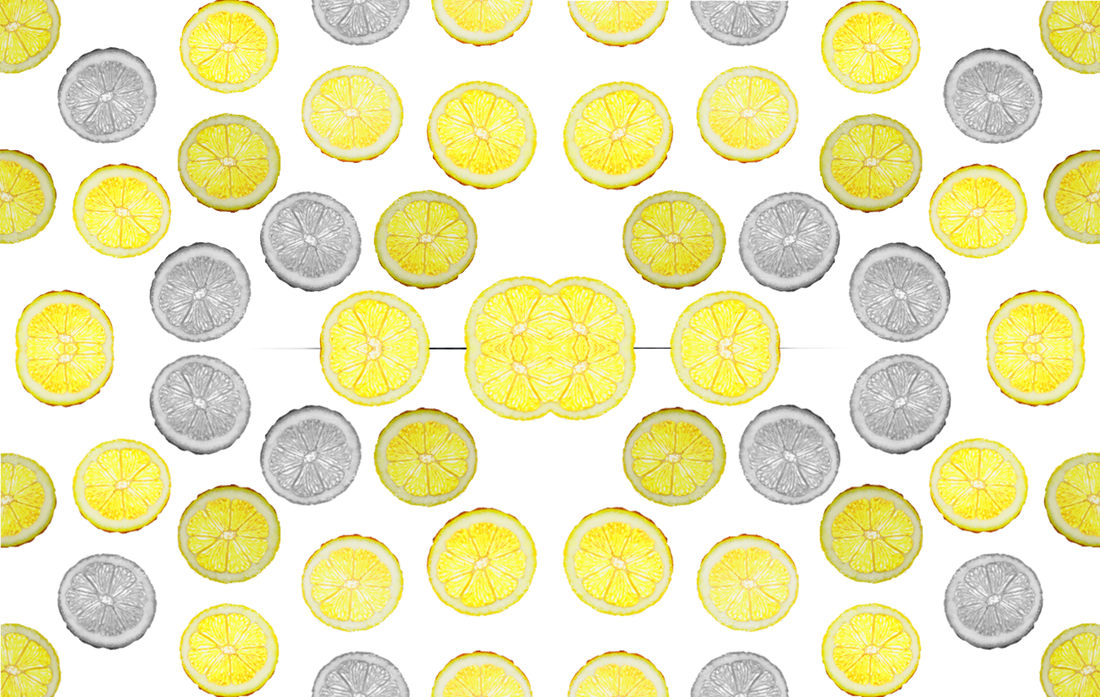
Editing Step 3: Then in this step, I duplicated my image numerous times so that it looks as if i had photographed multiple pieces of fruit. I also flipped my duplicate either horizontally or vertically so that it looks like a different piece of fruit.
|

Editing Step 4: Finally, I made some of my duplicates monochromatic and some of them I made pop using the auto pop feature in the adjustment setting. As well, I also changed the hue and saturation on them so some of them look different to the other ones around them,
|
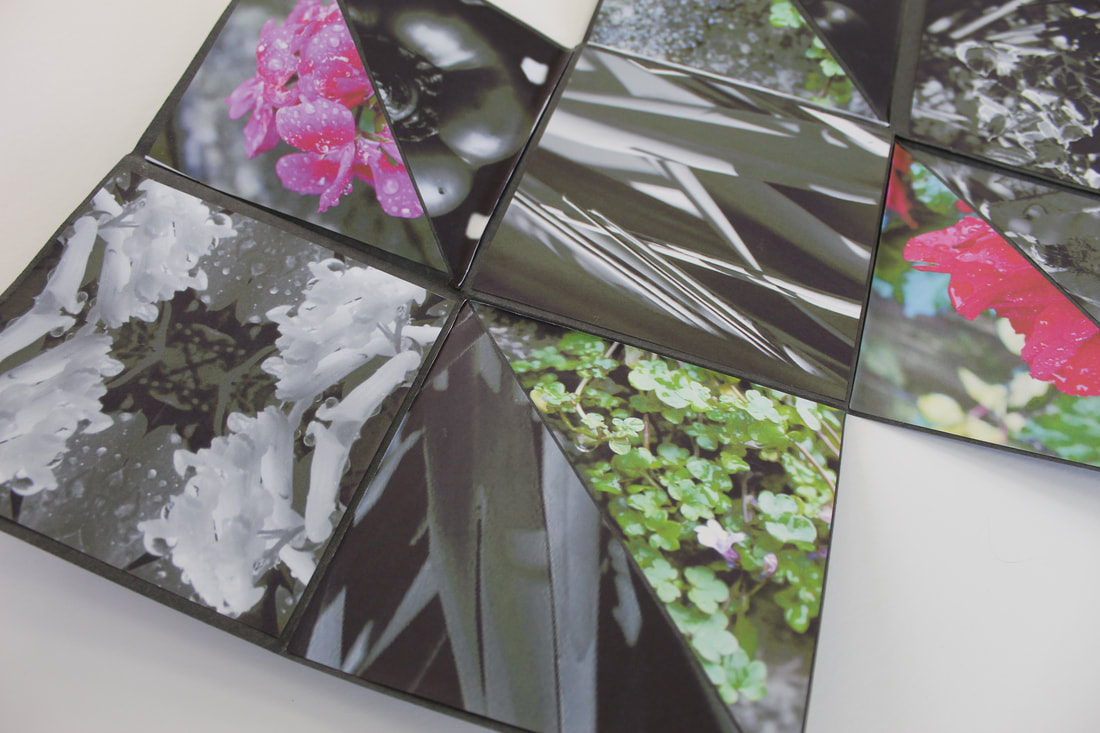
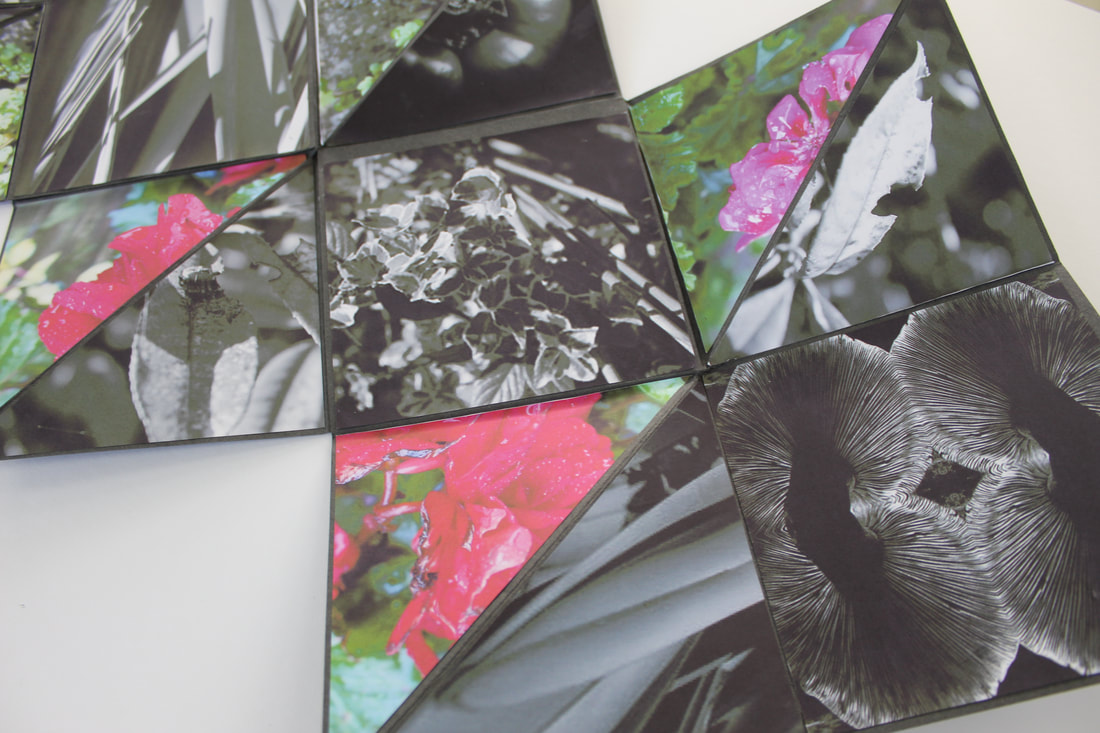
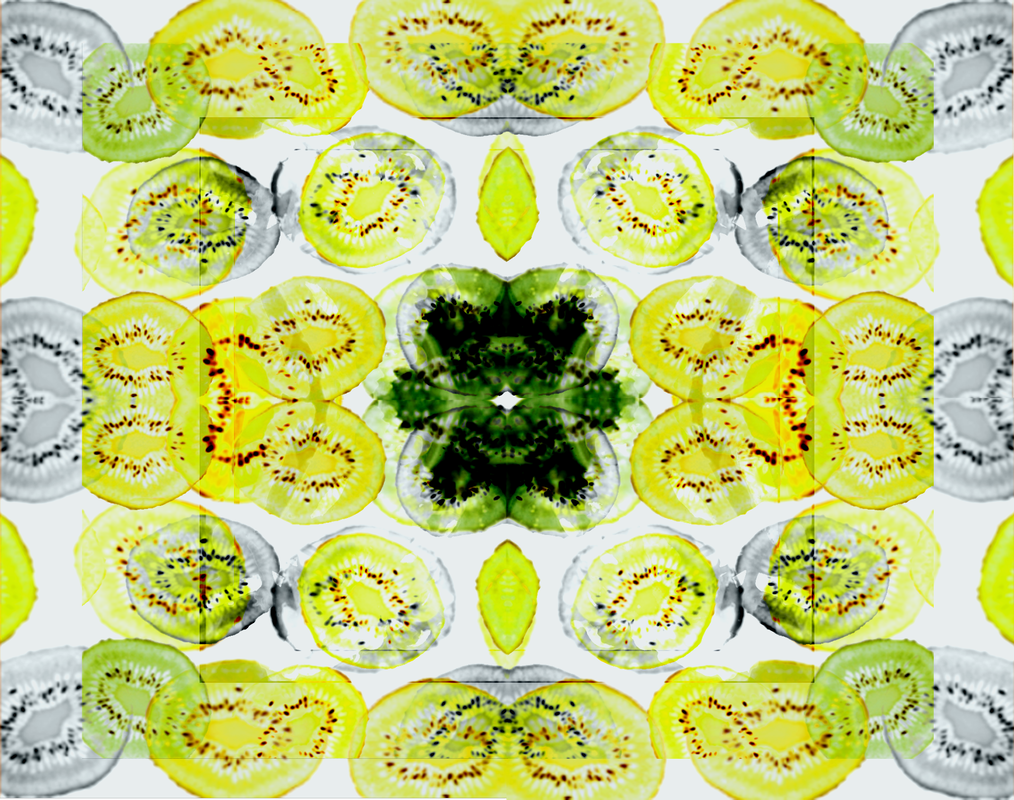
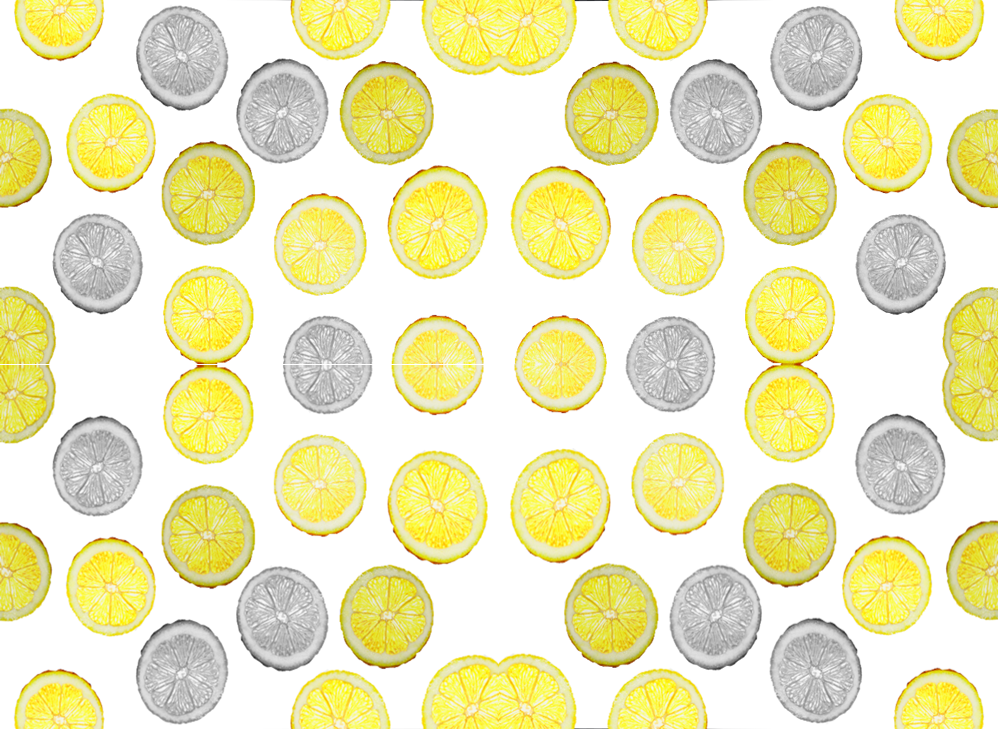
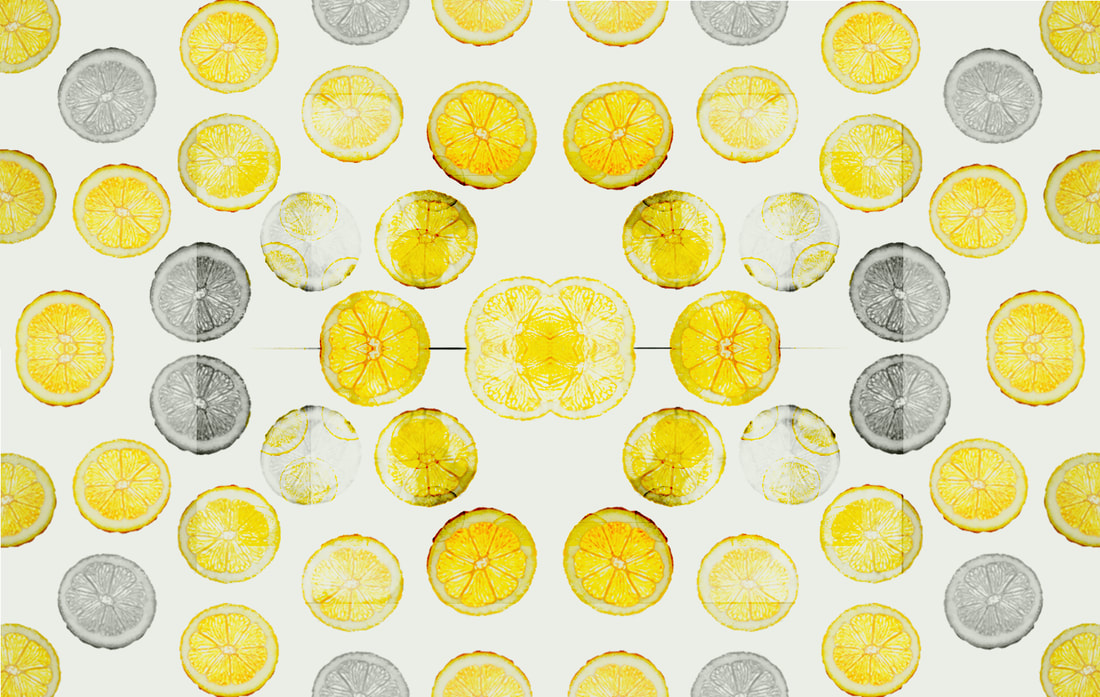
Rotational Designs // Dennis Wojtkiewicz
Using rotational symmetry and the work of Horst. P. Horst I have created multiple rotational designs using the elements of shape, colour, form, tone, repetition and harmony. I will continue to develop these images further by using PIXLR.


|
|
Abstract Nature Final Evaluation
Throughout this project I have developed my understanding of abstract photography by exploring the theme of nature. At first, I researched the work of Edward Weston, I found his low-key imagery captivating and I thought that the texture that was created in his natural forms work was magnificent. Whilst studying Edward Weston's artwork I was able to explore concepts such as line, shape, texture, tone and contrast in my own pieces of photography. I found that his ability to show contrast in his work's focal points interesting and again I tried to show this in my own work. Inspired by his work, I created a series of emulations by photographing multiple natural forms with a monochromatic style. Similar to Weston's later work, I investigated the use of controlled lighting, low-key and a studio. Edward Weston's work helped me understand the theme of abstract nature because of his unusual natural forms and his use of shallow depth of field which makes his work abstract.
After I studied Edward Weston I studied the work of the 19th century photographer Anna Atkins who's work I find inspiring because she is believed to be the first female photographer. Through studying this artist, I was able to explore line, shape and balance in my own cyanotypes. Inspired by Atkins's work I created my own series of Cyanotypes. I particularly enjoyed investigating this technical process because it was a new experience for me and allowed me to experiment with new processes. Her work allowed me to understand the theme of abstract more through the exposure of natural forms and contrast highlighting line and shape in the focal point.
Then, I studied the fashion photographer Horst. P Horst who created rotational symmetry patterns which inspired me to create my own emulations of his work. These rotational adjustments identified the abstract qualities and increased the unity and rhythm within the dynamic composition and pattern.
Next, I researched the German photographer Karl Blossfeldt, I enjoyed the fact that he apricated the natural world as well as his wish for others to observe the world. His thought linked well with my project. Through studying this artist I was able to explore high-key, close up and a direct approach in my photography examples. Inspired by Blossfeldt's work, I created a series of nine images using my DSLR camera. I investigated the high-key photography technical process and I had to adjust my camera's ISO, aperture and shutter speed settings, I also changed to a sepia tone.
Finally, I researched the artist Dennis Wojtkiewicz because I had been inspired by how he is different from the other artists that i have researched. He is different because of his use of realistic images and flat lay photography. However, there are multiple similarities in his use of back lighting and restful compositions that other photographers use. Whilst being inspired by Wojtkiewicz's images, I created some of my own. I created these images whilst being indoors so I could control the backlighting and so I could capture the colour and texture to a high standard. His work has helped me to understand the theme of abstract to a higher level because of the use of creating a focal point that is on its own which shown the natural beauty of different objects.
To conclude, I think that my most successful outcomes for my abstract nature projects were my nine shallow depth of field images because they show the contrast between the main focal point in the images and the background. They also often follow the rule of thirds and have a successful level of contrast within them. I would say that my main areas to improve are to enhance my editing skills and to add more detail into my contact sheets.
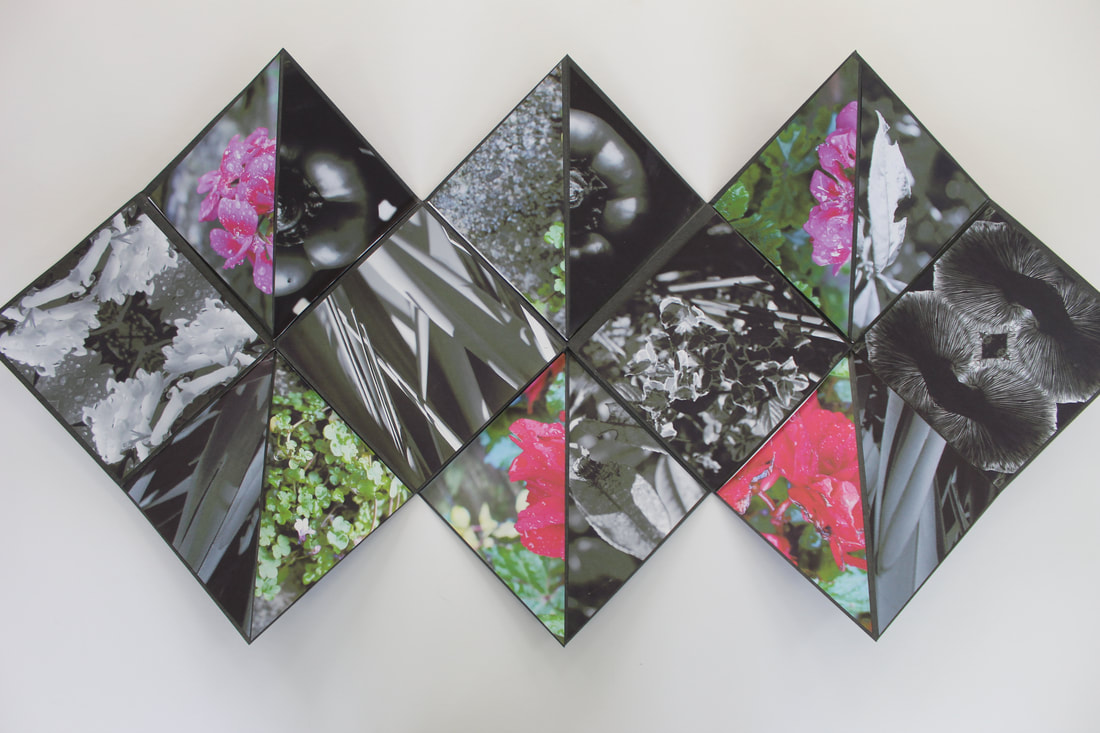
Abstract Nature // Hand Manipulation Sample Board

|

|
